 TEN USEFUL TIPS I LEARNED AT THE BOATYARD
Within months after buying our first boat, a 1981 Cooper Pilothouse 353, the through-hull valve for our toilet discharge broke in the closed position, making the toilet unusable. Since this valve is below the water line, I decided to do our first haul out.
Searching through the West Coast Boatyard Association’s Directory (www.westcoastboatyardassociation.com), Pacific Yachting’s annual Boaters Blue Pages and Marina Guide, and the Internet, I located 30 boatyards on the coast that allow owners to do their own work (see below). A few phone calls later, I realized that haul-out prices, daily storage fees, and wait times varied widely from yard to yard. I had heard from another boat owner that Jack’s Boat Yard in Lund was reasonable and friendly. Since it was also close to our home in Powell River, I made arrangements to have our boat hauled in May for what I expected to be a couple of days. This yard is a hub-bub of activity with about 50 boats, both power and sail, propped up on stands, with several coming and going each day.
ON THE HARD
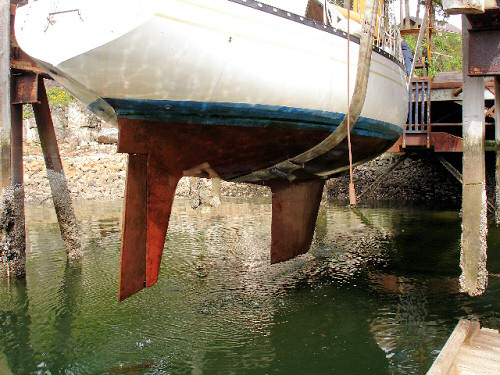
After our boat was out of the water, I discovered that the epoxy coving between the steel keel and fiberglass bottom had become delaminated, the prop was partially eaten away by electrolysis, and the bottom was long overdue for a paint job. A couple of days turned into a couple of weeks during which time I learned the following 10 tips, which might be useful to others who plan to put their boat on the hard and do their own work.
1. In some boatyards, equipment such as grinders, polishers, ladders and scaffolding is freely available to owners who want to do their own work. Materials such as zincs, grinding and polishing pads, thru-hulls, and painting supplies can be purchased at the yard’s office. Specialty items such as propellers and engine parts can be ordered through the yard. Shipwrights, mechanics and painters are available but very busy May through September so it’s best to book their services in advance.
2. Replacing through-hull valves, especially those in confined spaces, requires dexterity and determination. Prerequisites for success are the ability to contort one’s body to fit under a sink counter and the forearm strength of a gorilla (or a clever technique). I struggled for more than an hour trying to detach the rigid rubber hose from the faulty through-hull valve. Ted, a fellow boater in the yard, suggested using a hair dryer to soften the rubber. It worked like magic! I also used the dryer and liquid soap to reattach a new hose to the new valve. I had planned to use Vaseline but Ted warned me that its petroleum base causes rubber to deteriorate over time — not something I wanted happening to my toilet-discharge hose.
3. Zinc plates used to address the problem of electrolytic corrosion must make a good connection with the boat’s negative ground. I discovered that my aluminum prop resembled Swiss cheese because the attachment surface between the zinc and metal sail-drive unit was painted. The prop rather than the zinc became the sacrificial metal. A bit of sanding before installing a new zinc resolved that problem.
4. I learned the hard way to wear a proper mask when sanding or grinding a boat bottom. The resulting dust contains heavy metals, such as copper, which are harmful to the lungs. After about an hour of sanding without a mask, I began coughing. Several days later, I was still hacking dark stuff out of my innards. I tried a white surgical mask that attached to my face with a rubber band, but it did not provide adequate protection. So I finally relented, purchasing a proper respirator, with replaceable filter and airtight fit around the nose and mouth, for about $50. This mask also came in handy when painting the bottom and an enclosed space within the boat. At 25 bucks a lung, it proved to be one of my best boating-accessories investments!
5. When selecting a bottom-paint, I learned that there are many different brands, ranging in price from about $100 to more than $300 per gallon. However, there are only two basic types: ablative and non-ablative. The former wears off slowly with the boat’s movement through the water so fresh paint is always exposed to prevent algae buildup. The latter is more permanent and may contain silicone to prevent algae buildup. Apparently, ablative can be painted over non-ablative but not vise versa. The yard staff could not determine which type was on my boat, so I went with the ablative type. The less expensive brand that I chose had been recommended by another sailor in the yard who said that two coats usually lasts him three years.
6. Instructions on the paint can about area coverage (in square feet) suggested one gallon per coat so I purchased two gallons — about a half-gallon less than what I needed for two coats. Since this particular paint only came in gallon sizes, I had to purchase another gallon (In hindsight, I simply should have bought more than I thought I would need and if I didn’t need it, returned the unopened can). After the first coat dried overnight, I was helped by yard staff to relocate the boat stands so I could paint the unpainted portions on the second coat. I always wondered how they did that!
7. In preparation for painting my boot stripe, I tried using regular white masking tape. Unfortunately, this product kinked when I applied it on my curved hull surface. It also left traces of glue upon removal. Another boater, Ken, suggested I use a narrow width of green or, better yet, blue professional masking tape. Not only is it more pliable, but it also does not leave glue residue when removed. He also suggested removing the masking tape before the paint dried to prevent peeling — something every painter probably knows — which meant masking twice for two coats.
8. When painting my boot stripe, I used a small foam roller that left tiny paint bubbles resembling goose bumps. I hoped they would go away as the paint dried. They didn’t, requiring me to spend a couple of hours carefully sanding the entire boot stripe. Ken suggested the technique of using light strokes with a foam brush over the newly rolled paint to take away the bubbles. Voila! The resulting surface looked as if it had been professionally spray-painted.
9. Our boat had a bad case of “halyard wrap,” meaning the halyard occasionally wrapped around the forestay preventing the jib from furling. On our last outing, the halyard broke near the top of the sail and fell back inside the mast (I guess I shouldn’t have used a winch without fully assessing the problem!). Obviously, I didn’t need to be in a boatyard to fix this problem, but going up the mast in a bosun’s chair is less scary if the boat is steady rather than rolling in the water. So I arranged to have a knowledgable boating friend winch me up for my first time aloft. He suggested attaching a two-foot length of bicycle chain to a light line and lowering it down to the exit hole on the side of the mast. After fishing it through the hole, he attached a heavier line, which I hauled to the top of the mast. The last step was attaching the halyard to this heavier line and hauling it up. Using the bicycle chain as a weight proved ideal for slinking the pilot line past other lines, wires, and obstructions inside the mast.

10. Halyard wrap happens when a length of the halyard (in my case, only about a half-metre) extends parallel to the forestay from the masthead sheave to the top furling-bearing. Several companies address this problem with a halyard-restrainer device consisting of a sheave that attaches near the top of the mast, redirecting the halyard at a slight angle to the forestay. The one I purchased from Harken proved to be too small for my mast. While searching for a larger device, I figured out an “ah-ha!” solution to halyard wrap: I reduced the length of the halyard extending from the mast-head sheave to about 10 centimetres, moving the top furler closer to the mast and making the halyard too short to wrap. Then I added a length of line from the head of the sail to the bottom bearing of the furler of sufficient length to allow the sail to be hoisted tightly between tack and head. This solution was simple, inexpensive, and could be done without going aloft. And best of all, it works great!
Spending two weeks in the yard working on my boat proved to be a great learning experience. I found that on land, just as on water, most boaters tend to be helpful and willing to share their knowledge and experience with novices like myself. A special thanks to them and the friendly folks at Jack’s boatyard for all their advice and assistance.
BC BOATYARDS FOR DO-IT-YOURSELFERS
Lower Mainland
Captain’s Cove Marina, Ladner www.captainscovemarina.ca
Crescent Beach Marina, Surrey www.crescentbeachmarina.com
Delta Marina, Richmond www.marinasdirectory.org/canada/britishcolumbia/richmond/987.asp
Grandville Island Boatyard, Vancouver www.granvilleislandboatyard.com
Great Little Boatyard, Richmond (604) 231-0599
Inlet Marine, Port Moody www.inletmarine.ca
Lynnwood Marina, North Vancouver www.lynnwoodmarina.com
Mosquito Creek Marina, North Vancouver www.mosquitocreekmarina.com
Reed Point Marina Boatyard, Port Moody www.reedpoint.com
Shannon Buoys Marina & Boatyard, Richmond (604) 231-0599
Shelter Island Marina & Boatyard, Richmond www.shelterislandmarina.com
Thunderbird Marina, West Vancouver www.thunderbirdmarine.com
Gulf Islands
Silva Bay Shipyards, Silva Bay www.silvabayshipyard.com
Sunshine Coast
Buccaneer Marina & Resort, Halfmoon Bay www.buccaneermarina.com
Choquer & Sons Marina, Sechelt (604) 885-9244
Jack’s Boat Yard, Lund www.jacksboatyard.com
Madeira Marina, Madeira Park (604) 883-2266
Valley Marine, Powell River (604) 485-9257
Desolation Sound
Ocean Pacific Marine Supply & Boatyard, Campbell River www.oceanpacificmarine.com
Vancouver Island – South
Canoe Cove Marina & Boatyard, Sidney www.canoecovemarina.com
Maple Bay Marina, Duncan www.maplebaymarina.com
Vector Marine and The Boatyard, Sidney www.vector-yacht.com
Westport Marina & Yacht Sales, Sidney www.thunderbirdmarine.com
The Boatyard, Sidney (250) 655-1511
Vancouver Island – Central
Blue Peter Marine, Nanaimo (250) 655-1511
French Creek Marine, French Creek Harbour (250) 248-443
Newcastle Marina, Nanaimo (250) 753-1431
Stones Marina & Boatyard, Nanaimo www.stonesmarina.com
Vancouver Island – North
Quarterdeck Marine Industries, Port Hardy www.quarterdeckresort.net
North Coast
Shearwater Marine Group, Shearwater www.shearwater.ca